unity 3d draw distance pop end
Are you lot planning to optimize your game fabricated with Unity and become the best performance? In this Complete Unity Optimization Guide, I will show you how to increase functioning in Unity correctly, so your game will run fast & stable.
Here I will consider optimization tools provided by Unity Game Engine and too past Indie Developers (Publishers) in Unity Asset Store — Top Unity Assets (Tools) for Unity Optimization.
I will likewise deep into details of mutual performance issues in video games and find solutions for them: optimization of code and avails, tips & tricks.
Contents
- 1 Primary Optimization Bike in Unity
- 2 Types of Performance Issues
- 2.1 Spikes
- 2.2 Every-frame costs
- 2.3 Loading Fourth dimension
- 2.4 Memory Usage
- three Profiling
- 3.ane Connection to Profiler
- 3.2 Unity Profiler
- 3.3 Unity Profile Analyzer
- iii.4 Unity Frame Debugger
- 3.v Unity Memory Profiler v2
- three.6 Unity Physics Debugger
- iii.7 Unity UIElements Debugger
- 4 Benchmarking
- 4.1 Auto-Benchmarking System
- 4.2 Unity Assets for Benchmarking
- five Unity Optimization: Tips & Tricks
- 5.ane Lawmaking & Scripting
- v.2 Unity UI (UGUI)
- 5.3 Memory Direction
- 5.iv Reducing Depict Calls
- 5.5 Convex Mesh Collider for Circuitous Objects
- 5.six Project Cleaning
- v.7 Consoles: Xbox & PlayStation
- six Conclusion
Main Optimization Cycle in Unity
Unity Optimization refers to the process of making your game run better. Usually the main reason for optimization is to make the gameplay smoother, or to make the game more available to a wider audience and so the game runs better on lower end devices.

Side by side will be presented common optimization bike, which you need to go sequentially every fourth dimension when noticeably low FPS of a sudden occurs in your game after next stage of development:
- If your game works without lags and freezes on target platforms, then the game does non demand to be optimized. Do more than important things like new levels in current game.
Optimization for the sake of optimization is a waste of fourth dimension.
- If you have lags and freezes and then the starting bespeak is Profiling (firstly with Unity Profiler) to discover what kind of performance problems Unity Project has.
- After the optimization tasks take been determined and earlier the procedure of optimization is started, it is advisable to take some fourth dimension and consider which area of optimization is the priority. This is done by comparing the approximated time each specific implementing of optimization would take and a performance gain in result.
Resulting ordered list of optimization tasks volition work every bit a guideline for the entire procedure of optimization starting with the most effective action. This as well helps to gain the most performance with the least efforts. Follow this listing until the game on target platforms has shine gameplay and stable frame rate. - If the game is executing fantabulous without visible problems and the list of optimization tasks is not empty and so forget further optimization process.
- If the game withal has bug and so project should exist profiled and the data stored. Next stored information can be compared with a previous data allowing for closer inspection of the land of the whole optimization process.
Repeated profiling allows yous to understand what happened after the completion of a single optimization task, whether this procedure brought a operation improvement or not.
Types of Performance Issues
You tin Optimize Unity Game in different means depending on problem nature. Performance problems can exist divided into several types depending on their nature.
Spikes
Spike is a sudden drop in the frame rate of a game. This is noticed when a game of a sudden stops and doesn't move for a noticeable time. This can break the immersion of the player or crusade him to brand a fault he wouldn't have otherwise made. Spikes can exist seen as a high points on Profiler Graph.

Spikes are mainly acquired by complex calculations or difficult operations performed during a single frame. Annoying Spikes are a problem in high-intensity games which need a stable frame rate and loftier control over the game to feel good, such every bit driving or shooting games (FPS).

Spikes of Garbage Collector
Garbage collection spikes are frame rate drops specifically acquired by the garbage collection arrangement of Unity. These can be huge frame rate spikes and are easily noticed while playing the game. The spikes happen when the retention garbage limits met and the collection runs, cleaning up the unnecessary objects from the retention. Their frequency is mandated past how much garbage the game generates each frame. The frequency can be slowed down by generating less garbage during runtime.
The only fashion of preventing these spikes completely is to generate no garbage during runtime. This is a huge undertaking and must exist considered from the very commencement of a project.
Every-frame costs
Every-frame costs are the calculations and operations that are run every single frame. These can exist, for instance, physics calculations, running AI behavior or treatment animations of characters.
Every-frame costs dull down the full general frame charge per unit of the game. They are the footling things that dull the game down and make it feel less fluid. If a game only generally runs poorly, this is the expanse that needs work.
Loading Time
Loading time refers to how long the game takes to load. This includes the first load when the game is opened, and loading that happens during runtime, for example between scenes.
While not usually a major issue, having extremely long loading times or having loading screens appear far too often can negatively affect the user feel.
To reduce the length of loading screens, consider splitting upwardly the work done during them. This can mean preloading assets beforehand to reduce the number of objects that need to be loaded during loading screen, or reducing the complexity of loaded scenes.
Open up Earth
In an open up globe game, where many objects demand to be loaded during runtime, a method of recycling or streaming avails can be implemented. In "Within" Game a pocket-size office of every frame is defended to loading and unloading assets. This allows the whole four-hour experience to be played through with merely a single initial loading screen.
Retention Usage
RAM (Random Access Retentivity) is the memory on which a game is loaded while running. RAM stores everything needed by a game during runtime.
VRAM (Video Random Access Memory) is on a graphics card and is intended for graphical effects. VRAM is the storage used to store textures and models drawn past the graphics card.
RAM is what your CPU uses, while VRAM is what your GPU uses. Either or both might become a clogging on a project running with unoptimized or merely with far likewise many assets. When in that location is not enough memory, stuttering may occur.
To reduce the amount of memory needed past your project, consider side by side:
- Reduce the complexity of objects and the resolution of textures;
- Brand less unique assets in the project;
- Employ Object Pools.
Profiling
To know what is the issue with the performance of a project, profiling is needed. Profiling assists in understanding the unique issues establish in a project, and should always exist the starting point for optimizing a project.
Process of Profiling means reading the performance information of the project and finding out where the functioning issues are located. From this data bottlenecks can exist found.
Unity provides some different tools for profiling:
- Profiler,
- Profile Analyzer (package),
- Frame Debugger,
- Memory Profiler (package),
- Physics Debugger,
- UIElements Debugger.
This affiliate goes through each of these tools, analyses them and gives information on how to use them.
Connection to Profiler
Unity Profiler and Frame Debugger tin both be used to profile a projection currently running on the same editor. Withal, the editor affects the performance of the projection and the profiling information can be inaccurate. For this reason, if accurate profiling information is needed, a separate build should be created for profiling purposes.
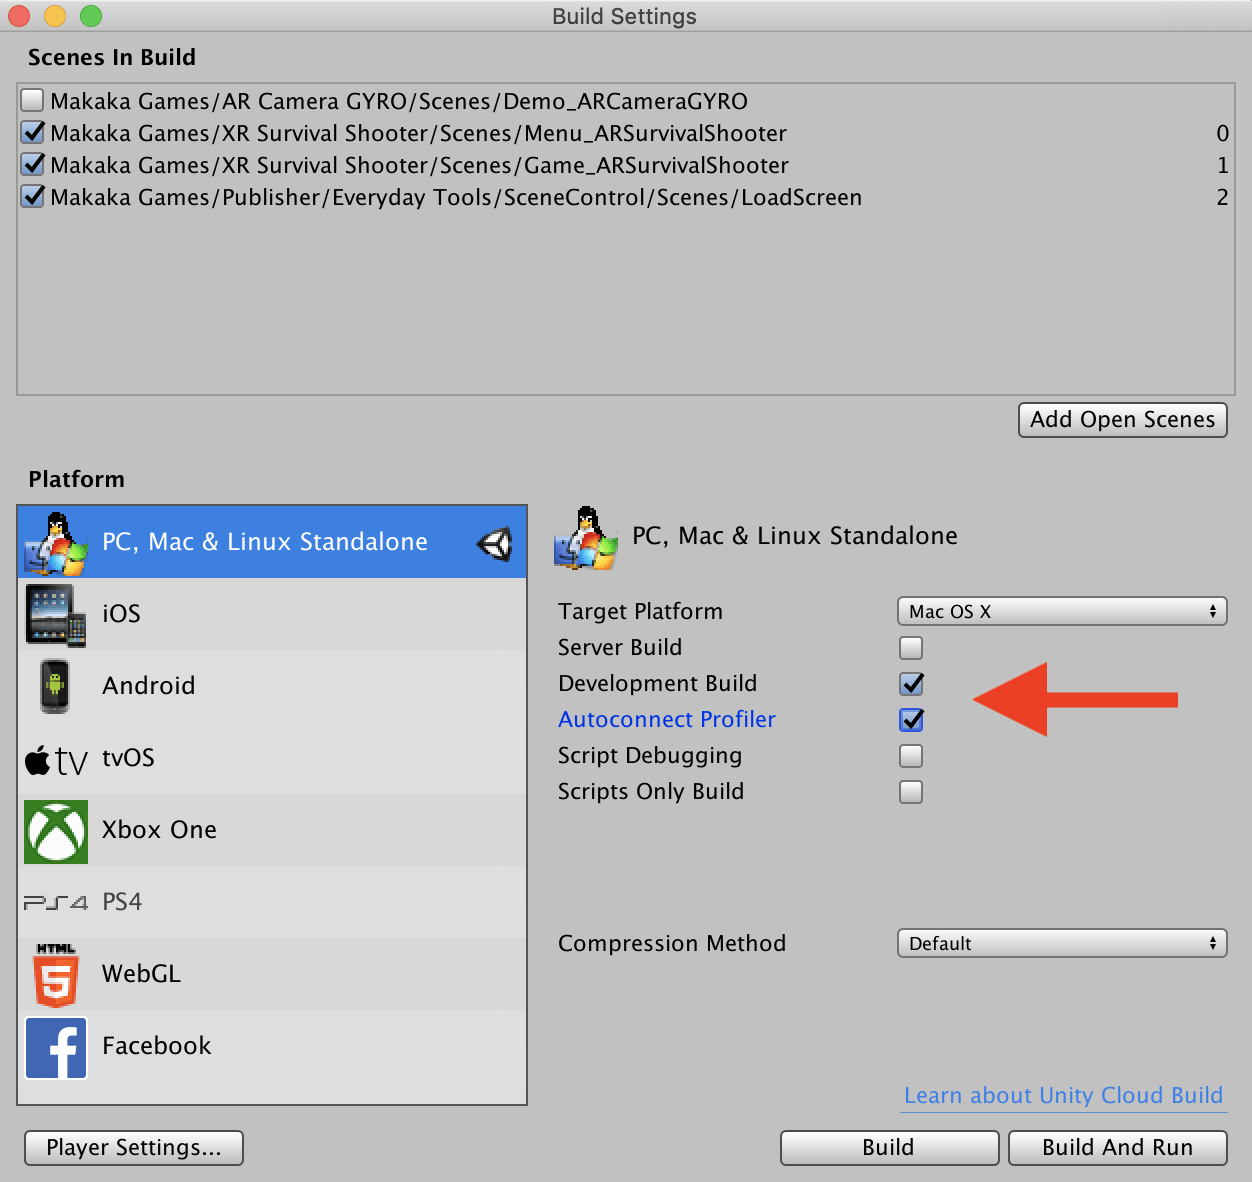
Making a build for profiling
To make a build which can be profiled, plow on options "Development build" and "Autoconnect Profiler" in Build Setting before making a build. This allows Unity Editor to observe the build and for the Profiler to connect to it.
Profiling External Devices
To go authentic profiling information, the build should exist profiled on terminate user device. When you optimize Unity Game for Mobiles then Profiling on a powerful PC gives little insight on how a user volition experience the game.
The easiest way to connect the Profiler to an external device is to have the 2 devices share the same local network. If at that place is a device running a development build of the project, it should be selected in the "Editor" dropdown menu of Unity Profiler, Frame Debugger or Console.

One time the correct device has been selected, the Profiler should automatically get-go profiling information technology. Profiling on an external device still affects the performance, merely the effect is less than when profiling on the same device.
Profiling of Mobile Devices
Mod mobile devices are powerful merely often lack an agile cooling organization. Because of this, the oestrus of the device affects its performance highly.
On mobile devices, the performance of a game can exist directly compared to the rut level of the device. When the device is just turned on and the application is launched, the functioning is at its best. Once the device has warmed upwards the operation starts to fall as the device tries to cool itself. And again, once the device has cooled down enough, operation is improved.
Mobile devices can be profiled through USB cable.
To effectively contour a mobile device, it should be warmed up beginning. Subsequently the build has run for x minutes, and the device has warmed upwardly properly, the profiling data becomes more accurate and more applicable to an bodily user feel.
Unity Profiler
Unity Profiler is the main tool for profiling Unity Projects. Information technology provides much data on the different performance areas of a project:
- CPU & GPU Usage;
- Rendering Info;
- Memory usage;
- Audio & Video;
- Physics (2D & 3D);
- Network Letters & Operations;
- UI;
- Global Illumination.
This tool is the offset of every optimization process on Unity. From information provided by information technology, bottlenecks are found and from these bottlenecks the first optimization tasks are created. Learning to use information technology helps to understand the piece of work of Unity Engine and Electric current Project.
Using the Profiler
Profiler Window tin be opened through the "Window > Analysis" tab of Unity Editor, or by pressing the shortcut CTRL+seven on Windows or CMD+7 on Mac Bone X.

Once Unity Profiler has been connected to a running build and the record push has been pressed, profiling information volition brainstorm to be nerveless and displayed in the window. To stop or break Unity Profiler simply toggle the Record push.
On the left side of the window the different profiling categories tin be seen, and more can be added from the "Add Profiler" dropdown carte at the pinnacle.
When profiling, information on each active category appears on the right side of the window. Each slice of the information presents a single frame. On the CPU usage category, execution fourth dimension the frame is presented by the height of the piece. Frames tin can be switched past pressing the arrow keys on the window, or by clicking a slice with the mouse.
Data on the selected category and target frame appears at the lesser of the screen.

Bureaucracy Manner
Next to the function name dissimilar values are shown. The values provide data on the performance of the role in the selected frame. These values are the pct of the total CPU time spend on this function, the number of times the part is called in the called frame, how much garbage the function generated and the time it took to end the office in milliseconds (total fourth dimension including inner functions (Time ms) and without them (Self ms)).
If these functions themselves telephone call other functions, a small pointer is shown adjacent to the name of the function. Clicking this pointer opens a office bureaucracy that shows how the total time of the function is split among the functions called by it.
The acme of the lines shown on the upper half of the window tells how long that frame took to finish. If these lines have noticeable spikes in them, there has been a frame rate drop. Hunting down what function caused the spike and optimizing it is a style of making the frame charge per unit and gameplay experience smoother.
Hierarchy Raw Mode
Hierarchy Raw Mode will separate global Unity function calls into private lines. This will tend to brand Profiled Information more difficult to read, but may helpful if nosotros are trying to:
- sympathize how Unity Engine works,
- to count how many times a detail global method has been invoked,
- to determine if one of these calls is costing more CPU/Retentivity than expected.
Timeline
You tin also utilise Timeline Mode of Profiled Information. It's only some other fashion to testify the data. You have in quick glance the whole situation of a frame in club of occurrence for all threads. So events showed at the left are the offset that happened and the right are the concluding.
Timeline Mode can be useful since it show more details than the normal version, and if you will click on some block then Timeline will tell you lot what Game Object connected to this block (e.chiliad., for Skinned Mesh Renderer or Animator).

It is useful to discover some bottlenecks, perchance you can notice the rendering is taking very lilliputian simply it's waiting a lot for CPU to send commands. You have the same data on Bureaucracy Manner of Profiler simply for some cases it'southward easier to spot certain problems every bit you tin graphically compare two items. Bureaucracy Way of Profiler is better when you are focusing on specific parts, the Timeline Mode it's better for a general picture.
Unity Profile Analyzer
Unity Profile Analyzer (package) the Unity Profiler'southward single-frame analysis by adding the power to analyze multiple frames at once. This is useful when it's important to accept a wider view of your functioning, such equally:
- upgrading Unity versions,
- testing optimization benefits,
- tracking performance as part of your development cycle.
It analyzes CPU frame and marker information that is pulled from the agile ready of frames currently loaded in the Unity Profiler or loaded from a previously saved Profile Analyzer session. The analyzed CPU frame and marker information gets summarized and graphed using histograms, and box and whisker plots, which compliment ordered list of activity for each marking, including:
- minimum,
- maximum,
- mean,
- instance count,
- range,
- which frame the marker first appeared in.


Getting Started with Profile Analyzer
Use Unity 2018.3 or higher:
- Open your project in Unity and go to "Window > Package Managing director".
- If yous don't see "Contour Analyzer" in parcel list then open the "Advanced" drop-down and brand certain "Show Preview Packages" is set.
- Select the "Profile Analyzer" & click "Install".
- Open "Window > Assay > Profile Analyzer".
Introducing the Profile Analyzer.
Unity Frame Debugger
Describe Phone call — unmarried chore performed on the GPU used to draw the screen. A single frame consists of multiple Draw Calls. Mod 3D games with complex graphical assets and effects may need thousands of Depict Calls to render the screen each frame.
Reducing the number of Draw Calls is a simple method to reduce the workload of the GPU.
To get information on what the GPU spends its Draw Calls on, Unity Frame Debugger tin exist used. By using the tool, more insight on the rendering process tin can exist got. It also is used to find the areas where the most Draw Calls are spent, and where optimization is required.
Frame Debugger Window can be opened through the "Window > Analysis" tab of Unity Editor.

Frame Debugger is connected the same way as Unity Profiler and can easily exist used either inside Unity Editor, debugging "Game" Window, or on a dissever device.
Debugging a build on the aforementioned device as the editor tin cause some problems like window freeze.
Once Frame Debugger has been activated, it freezes the profiled build and collects information on the frozen frame. Once the data has been collected, information on every Draw Call used to render that frame appears on the left side of the window. Depict Calls are organized into hierarchies such as drawing and epitome furnishings. Next to the hierarchy proper noun is shown the amount of Draw Calls information technology took to cease rendering that area.
By switching between Draw Calls on Frame Debugger Window, changes can be seen on the frozen frame of profiled build (or in the "Game" View in Unity Editor if y'all are profiling without build) equally the debugger shows what was drawn by each call.
By clicking a single Draw Call, more data on that specific call appears on the right side of the window. Switching between Draw Calls and watching the frozen screen change tin give enough of an idea on where optimization is required.
If the most of Draw Calls are spent drawing a unmarried object or a grapheme in the scene, work on that object might be required.
Unity Retention Profiler v2
Utilise the Memory Profiler (bundle) to identify potential areas in your Unity project (and the Unity Editor itself) where you can reduce memory usage. For instance, utilise the Memory Profiler to capture snapshot (represents the whole memory usage of the project), inspect, and compare 2 memory snapshots.
The Memory Profiler is unified solution allowing you lot to contour both small projects on mobile devices and big AAA projects on high-finish machines.
The Retentivity Profiler is a window in Unity Editor with an overview of native and managed memory allocations and can assistance you observe memory leaks and fragmentation with some unlike tool:
- Tree Map;
- Memory Map (Sequential Visual Representation of Retention Blocks);
- Tables (Lists of All Managed Objects with Filtering, Departure between 2 snapshots);
- Overview or Connectome (Visual Graph of Connected Objects).


Getting Started with Retentiveness Profiler
Use Unity 2018.3 or college:
- Open your projection in Unity and get to "Window > Packet Manager".
- If you don't meet "Memory Contour" in package listing then open up the "Advanced" drop-downward and make sure "Bear witness Preview Packages" is set.
- Select the "Memory Profiler" & click "Install".
- Open "Window > Analysis > Memory Profiler".
To utilize it, a build of the profiled project is needed because separate build has more accurate information in comparison with running projection in Unity Editor. Profiler must be connected to the build when the build is running and Memory Profiler is open in Unity Editor.
One time the window has been opened, the "Capture Player" button can be pressed. Wait for Problem Moment of Game and Capture Second Snapshot.
One time the snapshots accept been captured, they show up on the Memory Profiler and the profiled build is no longer needed. Next you lot tin can investigate each snapshot with different tools and compare them with "Diff" push.
Tree Map
Tree Map — Visual Representation of Memory like Programs for Infinite Analyzing of Hd.

Different colored squares indicate memory taken by unlike object types, for instance textures or meshes. Past clicking a square, information technology is divided further into smaller squares representing private objects. More information on these individual objects can be seen at the lesser of window by clicking them, and fifty-fifty a reference on what is using the object can be seen.
Only by looking at the memory usage snapshot separate upwardly by object type tells which objects use the most memory. Tracking down the individual large spenders and working on those can quickly bring down the retention used by the project.
Unity Physics Debugger
Physics Debugger — tool for quickly inspecting the Collider geometry in your Scene, and profile common physics-based scenarios. Information technology provides a visualization of which Game Objects should and should not collide with each other. This is particularly useful when there are many Colliders in your Scene, or if the Render and Standoff Meshes are out of sync.

You tin use Physics Debug to profile and troubleshoot physics activity in your game.
You tin can customize which types of Colliders or Rigidbody components you tin can see in the visualizer, to help you find the source of activity.
Testify active Rigidbody components only
To see only the Rigidbody components that are active and therefore using CPU/GPU resources, tick "Hide Static Colliders" and "Hide Sleeping Bodies".

Show non-convex Mesh Colliders merely
Non-convex (triangle-based) Mesh Colliders tend to generate the nearly contacts (comparing to colliders of simple forms) when their attached Rigidbody components are very about a collision with another Rigidbody or Collider.
To visualize only the non-convex Mesh Colliders, set the window to Show Selected Items mode, click the "Select None" button, then tick the "Show Mesh Colliders (concave)" checkbox.
Unity UIElements Debugger
UIElements Debugger — tool for debugging of Unity Editor Extensions that was written with UIElements, a new retained-mode GUI system for extending the Editor in Unity 2022 and higher. Information technology is useful for Nugget Shop Publishers who develop Editor Tools like "Bolt".
When y'all are working with UIElements, UIElements Debugger helps you lot visualize the hierarchy tree, backdrop and USS (Unity Style Sheets) files applied to each element.

Benchmarking
Benchmarking refers to collecting data from a projection to measure out its performance. This is different from profiling in that the benchmarking data should be as close to the performance of the concluding product equally possible. Because of this the data should not exist nerveless past using the Unity Profiling tools, since only running the tool has an impact on the functioning.
Benchmarks should exist taken on the aforementioned device as the final product is meant to run on. A unmarried device can exist good plenty, merely for getting many data, multiple devices of dissimilar performance capabilities should be benchmarked on. This way gives more information of the functioning on low- mid- and high-tier devices.
When benchmarking the frame rate of the project, a carve up script can be used to track the frame rate instead of using the profiling tool.
Read Also Consummate Commodity about Benchmarking on Unity Blogs.
Auto-Benchmarking System
To go along the frame charge per unit data accurate between benchmarks, the gameplay should exist reproduced as accurately as possible. The best way to handle this is to have a script that plays the game the same way every time. When the gameplay is identical betwixt benchmarks, they tin can be compared to each other and Unity Optimization Process can hands exist monitored.
Y'all tin can create a script having a single "Hub" Scene from which the other scenes were launched. The script would start the project on the everyman quality setting in the "Hub" Scene. From this scene it would open and play through the gameplay scenes, always returning to "Hub" Scene afterward a scene was completed. Later on finishing all the gameplay scenes, the quality level would be increased and playing through the scenes started again.
The automatic organisation would also collect performance information while running. This information was and so stored on text files created by the script. These files were saved on the hard drive of the device and organized by scene and quality level. You lot can run script on ii or more devices over the night and fresh data could be gathered on the side by side morning.
Unity Assets for Benchmarking
Advanced FPS Counter — Elementary and flexible in-game frames per 2nd counter with advanced features, made to permit you monitor stats of your game correct on the target device.

Show Advanced Stats with three tools:
- FPS Counter;
- Retentiveness Counter;
- Device Data Counter.

As well, have a look on These Crawly Tools:
- Stats Monitor;
- MadGoat Debugger & Criterion;
- FPS Graph;
- Lite FPS Counter (PRO).
Unity Optimization: Tips & Tricks
Every Unity Project is unique and has its ain unique bug. However, there is a many of well-known functioning related bug associated with Unity Engine itself. This chapter goes through several of the known performance problems in Unity and provides data on avoiding them.
The article is updating regularly. Please, share your experiences in the comments to extend this transmission.
Code & Scripting
Events
You demand to utilize C# Events instead of UnityEvents.
Aye, C# Events are not as convenient to employ as Unity Events because Unity Events can be shown in Unity Editor at least, but Unity Events have bad performance in most cases. Yous tin read research almost comparison C# & Unity Events. Moreover, assigning methods to events with Unity Editor is a bad practice in terms of code considering debugging a project past some other person in this instance becomes difficult.
Strings
Concatenation
Don't combine 2 strings in Update () Part because every fourth dimension information technology creates garbage by memory allocation.
Example with UI:
scoreText.text = "Score: " + currentScore.ToString();
Instead of information technology you need to create 2 separate text objects (TextMesh Pro, of form):
- For updating the text with current score.
- For caching "Score: " text.
Unity UI (UGUI)
The virtually common optimization effect with new Unity projects is the UI system.
Canvas
The basic chemical element of the Unity UI is a canvas. These canvases so house all other elements of the UI, be it text or images. The issue with these canvases is that when a single UI element on a sheet changes, the whole canvas is marked dirty and needs to be redrawn.
Often with developers who haven't had much feel with Unity, all the UI in the game is set under a single sheet. This can mean that a circuitous menu organization, even while hidden, needs to exist redrawn every frame because it shares the sheet with a timer, for example.
Multiple canvases is solution to reduce CPU Usage.
Optimize Unity UI with common method by splitting UI elements to separate canvases by update frequency. Elements that are updated regularly, similar Timers or Mana Orbs, nether a single canvas and static elements under another ane. This fixes the outcome of having to update every single UI element in every frame.
UI is a bottleneck especially on mobile devices. Transparent graphics are non handled well by mobile graphics cards, and all the UI elements in Unity are considered transparent. For this reason, splitting elements between multiple canvases can have a huge effect on the performance of the projection.
Unity Text vs TextMesh Pro
Unity Text Component (UI) & Unity 3D Text (Text Mesh component) have bad functioning.
Optimize Text with TextMesh Pro instead of default Unity Texts.
Getting Started with TextMesh Pro
Use Unity 2018.3 or higher:
- Open up your project in Unity and get to "Window > Parcel Manager".
- Select the "TextMesh Pro" & click "Install".
- Right Click on "Hierarchy View":
- "3D Object > TextMeshPro — Text" for texts in 3D infinite.
- "UI > TextMeshPro — Text" for HUD Texts with Canvases.
Read Adjacent: Making the most of TextMesh Pro.
Static Text vs. Texture
Your asset tin can have a texture that must contain static text (e.g., Route Signs). Yes, you can utilise TextMesh Pro to create a text over the texture, but this tin can be a bad idea, since UI elements that motility and resize in 3D space as the actor moves cause performance load. In this example signs tin can be replaced with transparent textures and then Texture of Road Sign must incorporate image & text now.
Retentivity Direction
Memory Management is done automatically in Unity. When deallocating the memory, Unity Engine often causes a huge frame rate drops. These drops are specially noticeable in fast reaction games, where stable frame rate is of import.
Many Unity Functions generate a garbage, making it most impossible to fix the garbage collection spikes, without changing the source code of the engine which is bachelor for purchasing exclusively to Pro and Enterprise customers of Unity Engine.
Post-obit are listed several methods of possible fixing of garbage collection bug.
Garbage Collector (GC)
All memory deallocation in Unity is done past Garbage Collector. When plenty retentiveness has been allocated, the garbage collector automatically clears unused objects from the retention for a single frame. This is referred to as running the garbage collector, and always causes a frame rate driblet.
Unity 2019.1 with .Internet 4x Equivalent introduces to Incremental Garbage Collection which splits GC performance over number of frames. So only plough it on in "Player Settings > Other > Apply Incremental GC".
Larn More about Incremental Garbage Drove.
Performance Tools:
- Avant-garde Render Organization;
- Super Level Optimizer;
- Advanced Culling Arrangement.
Courses for completely agreement Unity Workflow.
There are multiple means to reduce the performance touch and the frequency of running the garbage collector. The simplest is to generate less garbage during runtime. When profiling the CPU, the amount of garbage generated by each office tin be seen. And so you lot can change these functions to generate less garbage.
Manual Garbage Collection
1 way to solve the consequence is to manually run the garbage collection when the gameplay is less active, and the frame rate driblet won't affect the user experience. For example, during loading screens or during more peaceful (passive) periods of gameplay.
System.GC.Collect();
This still caused a noticeable frame charge per unit drop, but at a time when information technology did not negatively bear upon the gameplay.
I don't recommend to utilise Manual Garbage Drove because is a last measure — in 95% of cases you lot will success without it. First of all, you lot should deal with all the bottlenecks of your project.
Caching
Caching is a technique of reusing object. Caching refers to storing something that is often needed as a variable instead of calculating or fetching it whenever it is needed. For instance, this can mean storing the camera as a variable in a script instead of calling "Camera.Primary" whenever the photographic camera is needed.
Unity APIs such as "Camera.main" or "gameObject.transform" causes a little overhead. Camera.Main is a shortcut for finding a photographic camera object from the scene with the tag Main. This value is never stored so every time the function is called, a search operation is performed. All this overhead can be fixed by storing a reference to the object as a variable later on the outset call of the office.
For example, no need of creating the aforementioned local variable every frame in Update () Office:
void Update() { string s = "Text"; text.text = s; } Instead of information technology you lot can assign the variable when declare a variable as a field of class, and initialize information technology here or in Awake () or Start () functions if it makes sense in your case.
Object Pooling
Object Pooling is too Caching, but in this case we are dealing with several objects of the same type (e.g. with the same script components) or same prefabs. Read more about Object Pool.

Texture Settings
Resolution
You can reduce the resolution by adjusting "Max Size". "Max Size" setting is not-destructive meaning information technology does non change the original texture size — it but adjusts the imported size. E.g, set max size to 1024 instead of 2048 printing employ to save the changes.
Texture Adjustments (Unity Asset) tin can be used to ingather, resize and adjust textures in Editor and Runtime using GPU accelerated ultra-fast filters.
Normal Maps
Normal Maps can commonly exist set to a lower resolution than Albedo or Colour textures equally the lower resolution is less noticeable in case of Normal Maps.
Read/Write Enabled
Mutual pitfall of texture retentivity usage is using "Read/Write Enabled" selection on a texture that does non need it. If the option is enabled on a texture, it will stay in CPU retentiveness even after being sent to the GPU (which you can't admission directly without a performance penalty). This can double texture memory in most cases.
The option is needed to enable admission to the Texture data from script functions (such every bit Texture2D.SetPixels, Texture2D.GetPixels and other Texture2D functions). Note that a copy of the Texture data is made, doubling the amount of retentivity required for Texture Assets, so merely use this property if necessary. This is merely valid for uncompressed and DXT compressed Textures; other types of compressed textures cannot be read from. This property is disabled by default.
Sound Clip Settings
Compression Format
PCM — the about memory intensive format. PCM compression is a lossless format useful for short sounds as the CPU processing required to decode PCM is very low. For long clips y'all can use lossy Vorbis compression format. It volition assist us save the space in retentiveness and on disk.
Quality
By reducing the quality setting with PCM we tin can trade sound quality for even more memory savings.
Latency or Delay
You can hear audio filibuster, Especially on mobiles: iOS & Android. To set this issue you tin fix "Audio Setting > DSP Buffer Size > All-time latency".

If the problem is yet relevant, then employ Native Audio (Unity Asset).
Pre-allocating retention
Unity pre-allocates a minimum amount of memory on startup. This is called the heap. When the heap is filled, new memory must exist allocated and this tin exist performance intensive.
One way to avoid the event is to manually allocate a big corporeality of retentiveness on startup and so empty that memory. This corporeality should be shut to the measured maximum amount of memory needed by the programme. This forces Unity to expand the heap on startup and removes the operation issues caused past expanding the heap during runtime.
Reducing Draw Calls
The simplest style to optimize Game Objects is to remove objects drawn. This can be washed by removing not critical (redundant) objects from the scene.
Static Game Objects and Batching
Game objects can exist marked as static in the editor. This mark tells the engine that the marked object will never move. This allows the engine to use a method called batching to render it.

Batching happens when the engine draws multiple objects on a unmarried Draw Telephone call.
Piece of work Conditions for Static Batching:
- the objects must be marked as static & share the same material;
- turn on "Static Batching" option in Histrion Settings.
By using the Frame Debugger that was considered in the first part of this article, you tin come across when batching has been used to reduce the number of Draw Calls. The debugger will also tell you why a Draw Telephone call was non rendered in the same batch as the previous one.
Frustum Culling
Frustum Culling removes objects outside the camera view from the rendering process, saving Describe Calls without affecting the user experience. In Unity, this is an automated process and is e'er on, requiring no setup from the developer.
Apoplexy Culling
Apoplexy Culling works alongside Frustum Culling as an additional method of reducing Describe Calls. While Frustum Culling hides objects exterior the view, occlusion culling aims to minimize draw calls in view. This is achieved by removing objects hidden behind other objects from the rendering procedure.

Different frustum culling, an automated process, the occlusion alternative must be prepare and baked beforehand in Unity Editor. Unity has provided an object called "Occlusion Alternative Expanse", which can be created from the "Occlusion Culling" window. The window can be constitute nether the "Window > Rendering" menu item. These objects need to be placed in the globe before the data tin be baked. This tin be washed manually or through scripts.
Game Objects with the tags "Occluder Static" and "Occludee Static" are included in the Apoplexy Culling process. These are on by default in Static Game Objects. When an object marked with "Occluder" tag hides an object marked with "Occludee" tag behind information technology from camera view, the "Occludee" object is removed from the rendering process.

The occlusion areas are to be set upwardly such that the camera will never wander outside them. If the photographic camera go outside the occlusion alternative areas, no occlusion culling volition be practical, causing errors such every bit invisible objects and holes in the terrain.
Once the occlusion areas have been ready upwards, apoplexy alternative can exist broiled. This is done from "Apoplexy" Window. In one case completed, the furnishings of occlusion culling can exist viewed by using the "Visualize" tab on the scene window. This allows for debugging by moving the photographic camera and observing the changes in editor.
If popular-in of objects and other errors occur, at that place are few means to solve the issue:
- The values provided in the occlusion window can be tweaked, affecting the precision of the culling, the size of the baked file and the time it takes to finish the blistering procedure.
- Other way of adjusting the culling precision is to alter the size and frequency of occlusion areas. Multiple pocket-size areas tin can be more precise compared to a single larger area, but tin can increase the baking time and the size of the baked occlusion data file.
- If there are notwithstanding objects that are non correctly culled, they can be taken out of the occlusion process entirely past removing the Occludee Static tag from the game object.
LOD levels on 3D objects
Optimize Mesh Data with LODs (level of particular — system used on 3D objects to reduce their touch on the performance). Information technology functions past replacing the high-quality 3D object with a similar object of lower quality when they get further away from the camera. Often the 3D object is replaced further with a second render of it and even removed completely.

LOD levels can be prepare by adding the LOD component to Game Object. From the component the amount of levels and the level irresolute distance can be modified. The way Unity determines when the LOD level should be changed, is how much of the object is on the screen at a given time. This tin can cause weird behavior in objects partially hidden or underground, for example rocks. This method of reducing Draw Calls causes more work on the artists end since the lower quality objects need to be made past someone.
Terrain
- Use the lowest LOD level of the terrain, losing some of the fidelity but removing the need for runtime calculations.
- Supersede most of the trees in scenes with 2D images, reducing the workload of the foliage organization without much affecting the user experience.
Terrain Streaming
Just having many objects, especially terrains, in a single scene acquired the performance of scene go down drastically.
You lot can utilise several ways to stream scenes:
- The initial scene was divide into multiple smaller scenes, and they were loaded and unloaded when necessary (when player enters in portal, eastward.chiliad.).
- Streaming the terrains within the scene. Instead of having over 30 terrains e'er active in the scene, simply 9 terrains around the player character would be active at in one case. For the remainder of the terrains a boundary was set that would trigger when the histrion would move inside it. When a purlieus was triggered, system moves the already existing terrains in front end of the player and replaces the data of the moved terrain past a new one. So no spawning was necessary, and instead the same 9 terrains were being recycled through the whole scene.
Convex Mesh Collider for Circuitous Objects
Unity allows you lot to employ only convex mesh colliders because they have less performance load instead of non-convex ones. In some cases, it is not what you need considering the collider covers more space, than the object itself in some points.
Use the post-obit techniques to achieve accuracy of collider space:
- Create many simple forms of colliders and place them on Game Object manually.
- To rapidly & automatically go a convex mesh collider for complex objects, use Technie Collider Creator (Nugget Store).

Project Cleaning
Nugget Hunter PRO — solution for cleaning your project from garbage and missing elements.

Consoles: Xbox & PlayStation
Decision
Optimize Unity Game with the thought in your head that each projection is unique and the performance issues found in them are unique too. Learning the usage of the tools provided helps immensely in finding and agreement these issues.
Unity Optimization Process should be started in a projection lifetime as presently as at that place is something to optimize. This should be done before at that place are too much to change if big changes are needed. Withal, over-optimization can also be an consequence.
Remember to not spend time optimizing what doesn't provide much performance gain.
If performance event can't be measured, it's not an issue.
When starting a projection, take some time to consider some baseline practices for the assets created for the projection:
- Do y'all really need those 2K textures for your mobile game?
- Does information technology actually need these complicated calculations done every frame?
Changes to an already existing asset or code can exist tedious and take a long fourth dimension to do. Doing them before the project has grown too large to handle can save a lot of time.

Source: https://makaka.org/unity-tutorials/optimization
0 Response to "unity 3d draw distance pop end"
Post a Comment